Aug 28, 2007 - .NET Framework 3.5のWPF

Tech・Edで川西さんのセッションに .NET Framework 3.5でのWPFの拡張の説明がありました。 この中のUIElement3Dって、もしかして3Dでボタンなどの部品を表示出来るのか!?と思ったのですが、 WPF3D Team Blogによるとそうではありませんでした。
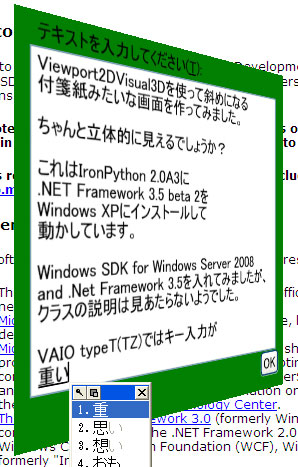
3Dでボタンなどの部品を表示するときは、Viewport2DVisual3Dというクラスを使います。 使い方はModelVisual3Dと同様で、Visualプロパティにボタンやパネルなどを指定します。
from wpf import *
from System.Windows.Media.Media3D import *
from System.Windows.Media.Imaging import *
import math

rotX = lambda x: AxisAngleRotation3D( Vector3D( 1, 0, 0 ), x )
rotY = lambda x: AxisAngleRotation3D( Vector3D( 0, 1, 0 ), x )
rotZ = lambda x: AxisAngleRotation3D( Vector3D( 0, 0, 1 ), x )

class Control3D(Window):
    def __init__( self, cx, rot, bg, fov=40, transparent=True, **keywords ):
        self.canvas = Canvas( Width=cx, Height=cx, Background=bg )
        self.rotation = rot

        # ウィンドウの初期処理
        Window.__init__( self, **keywords )
        self.Width = self.Height = cx * 2
        if transparent:
            self.WindowStyle = WindowStyle.None
            self.Background = Brushes.Transparent
            self.AllowsTransparency = True

        # 3Dビューの初期化
        view = Viewport3D()
        view.ClipToBounds = False
        view.Camera = self.__getCamera( fov )
        view.Children.Add( ModelVisual3D( Content=AmbientLight( Colors.White ) ) )
        view.Children.Add( self.__getModel() )
        self.Content = view

    # カメラ設定の取得
    def __getCamera( self, fov ):
        cam = PerspectiveCamera( LookDirection=Vector3D(0,0,-1), UpDirection=Vector3D(0,1,0) )
        cam.Position = Point3D( 0, 0, 1 + 1/math.tan(math.radians(fov)*.5) )
        cam.FieldOfView = fov
        cam.NearPlaneDistance = 0.5
        cam.FarPlaneDistance = 100
        return cam

    # 物体の取得
    def __getModel( self ):
        material = DiffuseMaterial( Color=Color.FromArgb( 255,255,255,255 ) )
        geometry = MeshGeometry3D()
        for (x,y,z) in ((-1,1,0), (-1,-1,0), (1,-1,0), (1,1,0)):
            geometry.Positions.Add( Point3D( x, y, z ) )

        for i in (0, 1, 2, 0, 2, 3):
            geometry.TriangleIndices.Add( i )

        for (x,y) in ((0,0), (0,1), (1,1), (1,0)):
            geometry.TextureCoordinates.Add( Point( x, y ) )

        model = Viewport2DVisual3D( Material=material, Geometry=geometry )
        model.Transform = RotateTransform3D( self.rotation )
        model.SetIsVisualHostMaterial( material, True )
        model.Visual = self.canvas

        return model

    # ウィンドウのドラッグ処理
    def OnMouseLeftButtonDown( self, *args ):
        self.DragMove()

    # Canvasに要素を追加
    def add( self, el, x, y ):
        Canvas.SetLeft( el, x )
        Canvas.SetTop( el, y )
        self.canvas.Children.Add( el )
上記ソースを「control3d.py」という名前で保存してください。 ちなみに、↑でimportしているwpf.pyは私が独自に作ったモジュールです。
コマンドプロンプトでipy.exeを実行し、対話操作で次のようにコマンドを入力すると、スクリーンショットのような画面ができます。win.rotation.Angleプロパティの値を変えると、パネルの向きが変わります。
>>> from control3d import *
>>> win = Control3D( 250, rotY(60), Brushes.Green )
>>> win.Show()
>>> win.add( Label( Content='テキストを入力してください(_T):' ), 10, 0 )
>>> win.add( TextBox( Width=230, Height=200, AcceptsReturn=True ), 10, 20 )
>>> win.add( Button( Content='OK' ), 220, 220 )
>>> win.rotation.Angle=45
Perforatorで確認したところ、.NET 3.5であるにも関わらず、Windows XPの場合レイヤーウィンドウはソフトウェアレンダリングしていました。Vistaではちゃんとハードウェアでレンダリングされます。
